この日本語訳は以前のクライアントで表示されていた日本語訳を 2009年8月 の段階でのチュートリアルに合う形で切り貼りと追加をしたものです。チュートリアルは頻繁に変わるので、合ってない場合もあります。
また、スクリーンショットはウィンドウの配置などが微妙に異なる場合があります。
赤字は読むべき注意を、緑字は覚えておくとちょっといいことを書いています。
Crash Course (短期集中コース) 
You need to be in the training area to continue. Press Next or Warp To to continue.
次へ進むには、トレーニングエリアにいる必要があります。[Next(次へ)]または[Warp(ワープ)]をクリックします。
Welcome to EVE. This tutorial system will familiarize you with the basic functions of EVE.
If you are a newcomer then this Crash Course is essential.
EVEへようこそ。このチュートリアルシステムは、EVEの基本的な機能をあなたに説明するための物です。
もしあなたがEVEの初心者なら、この短期集中コースは必須です。
Nextボタンをクリックします。
Crash Course (短期集中コース) 
This crash course will guide you through basic survival techniques. You can move back and forward by pressing the Back and Next buttons.
この短期集中コースは、EVE の世界で生きていくための基本的なテクニックを説明します。[Back(戻る)]と[Next(次へ)]ボタンを使って、前に戻ったり次に進んだりできます。
Rewards (報酬) 
You will be granted rewards on various pages of tutorials. They will be placed in your cargohold, or in your items hangar if you are located at a station. You can however only get each reward once.
チュートリアルでは、様々なページに報酬が用意されています。これはページの一番下に示され、カーゴホールド、またはステーションにいるときはアイテムハンガーの一番下に置かれます。ただし、報酬をもらえるのは一度だけです。
Other tutorials (他のチュートリアル) 
This tutorial will guide you through the remainder of your training.
You can access this tutorial as well as many others through the Help button on the Neocom, or by pressing F12.
このチュートリアルは、この後もあなたのトレーニングをガイドしますが、あまり長いものではありません。しかし、NeoCom のヘルプボタンをクリックするか、F12 キーを押すと、これを含む様々なチュートリアルにアクセスすることができます。
Basic Commands (基本操作) 
Mouse and keyborad 
All functions in EVE are accessed using the mouse and keyboard. There are certain commands fundamental to making your way around the game's interface. Let's take a look at those now.
EVE の操作は全てマウスとキーボードで行います。この後、基本的なものをいくつかご紹介しましょう。
left mouse button (左マウスボタン) 
The left mouse button is used for selecting things, pressing buttons, dragging and dropping, and other command functions (such as, for example, moving forward in this tutorial).
左マウスボタンは、何かを選択するときに使います。ボタンをクリックする、ドラッグする、ドロップする、など様々な使い方があります。たとえば、このチュートリアルを進めるのにも使用します。
right mouse button (右マウスボタン) 
The right mouse button is used to bring up the contextual menu. The right-click is an important and useful tool, so keep this in mind at all times. A good first step in most situations, if you are uncertain how to proceed, is to right-click.
右マウスボタンは、コンテキストメニューを表示するときに使います。右マウスボタンは様々な場面で使用することになるので、いつも意識するようにして下さい。どうすれば良いか分からないときは、まず右クリックしてみることをお勧めします。
Your Advancement 
Skill relations (スキル関連) 
Your character will advance primarily through the training of skills. They allow you to use more modules and ships. Here is a Civilian Damage Control unit, a module that will increase your resistances to damage.
キャラクターは、主にスキルを習得することで成長します。スキルを習得すると、使えるモジュールや船が増えていきます。これは Civilian Damage Control I という、シールドとアーマーがダメージに耐える力を強化するモジュールです。
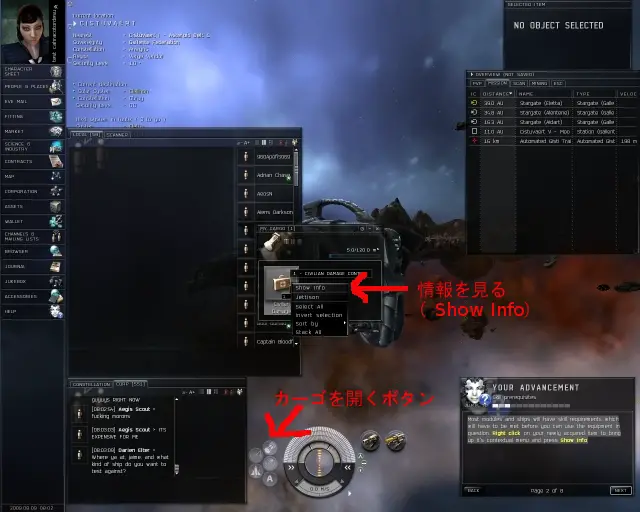
Open your cargohold now by pressing the indicated button.
船のカーゴホールド(Cargo Hold)を開いてから、次に進んでください。
Your Cargoholdという吹き出しが出るのでそこをクリック
Civilian Damage Control
Utilizes a combination of containment field emitters and redundancy systems to prevent critical system damage. Grants a bonus to resistance for shield, armor and hull. Only one Damage Control can be activated at a given time.
Skill prerequisties (スキルの前提条件) 
Most modules and ships will have skill requirements which will have to be met before you can use the equipment in question. Right click on your newly acquired item to bring up it's contextual menu and press Show Info.
ほとんどのモジュールと船にはスキルの前提要件があり、これを満たしていないとそのアイテムを使用することはできません。新しく手に入れたアイテムは、右マウスボタンを使ってコンテキストメニューを表示し、[情報を表示(show info)]を選択してみましょう。
show info (情報を表示) 
You can access more information about any item by using the Show Info command. This will give you assorted information about the item: its description, attributes, prerequisites and more. Press the Prerequisites tab.
どのようなアイテムでも、[Show Info(情報を表示)]機能を使って関する詳しい情報を確認することができます。ここでは、アイテムに関する様々な情報が得られます。説明、特性、前提要件などです。
- 青い丸をクリックすることでも情報を表示できます
skill prerequires (スキルの前提条件) 
This module will require you to have the Hull Upgrades and Mechanic skills trained to level 1. You have not trained Hull Upgrades yet so it is marked with a red X. A copy of this skill has been placed in your cargohold.
このモジュールを使うには、Hull Upgrades スキルと Mechanic スキルのレベル1 を習得しておく必要があります。持っていないスキルは、その前に赤い X が表示されます。このスキルブックは、報酬としてカーゴホールドに置かれています。
Hull Upgrades
Skill at maintaining your ship's armour and installing hull upgrades
like expanded cargoholds and inertial stabilizers. Grants a 5% bonus to
armor hit points per skill level.
Train your skills (スキルをトレーニングする) 
You should train your newly acquired skill. To do so, Right-click to bring up the contextual menu on the Hull Upgrades skill and select Train Now to Level 1. When you do this, the skill is removed from your cargo hold and added into your character sheet.
手に入れたスキルブックを使ってトレーニングしましょう。それには、Hull Upgrades スキルブックのコンテキストメニューを表示して、[スキルをトレーニング(Train Now To Level 1)]を選択します。スキルブックがアイテムハンガーから消えます。
You can now close your cargohold and the Show Info window.
カーゴホールドウィンドウとShow Infoウィンドウを消してください。
消すにはウィンドウの右上の×ボタンを押してください。
Character Sheet (キャラクターシート) 
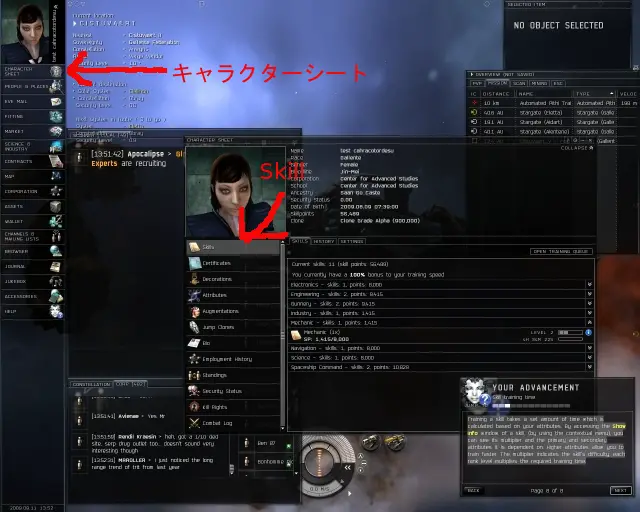
When you start training a skill, it is moved into your Character Sheet. Open the Character Sheet now by pressing the highlighted icon in the Neocom.
トレーニングを開始すると、スキルはキャラクターシートに移動します。キャラクターシートを開いてみましょう。NeoCom 上でハイライトされているアイコンをクリックして下さい。
Character Sheetという吹き出しが左上に光るのでそこをクリック
Skill Section (スキルセクション) 
In the Character Sheet there is a section called Skills, where you can view all of your skills. If you open the Mechanic category now, you will see the skill you are currently training is highlighted.
キャラクターシートの中では、Skillsというタブがあり、ここではあなたのスキルをすべて見ることができます。もしもあなたが Mechanic カテゴリーを開いた、今あなたがトレーニングをしているスキルがハイライトして見ることができます。
Skill Traning Time (スキルのトレーニング時間) 
Training a skill takes a set amount of time which is calculated based on your attributes. By accessing the Show Info window of a skill, (by using the contextual menu), you can see its multiplier and the primary and secondary attributes it is dependent on. Higher attributes allow you to train faster. The multiplier indicates the skill's difficulty; each rank level multiplies the required training time.
スキルをトレーニングするにはあなたの Attributes を元にして計算した時間がかかります。スキルのShow Info を右クリックのコンテキストメニューから開くと、そのスキルでの計算に使う係数および Primary と Secondary の Attribute を見ることが出来ます。係数はそのスキルの困難度を示しています。それぞれのランクの数字がトレーニングに必要な時間の掛け算となります。
キャラクターシートを閉じてください
Camera Movement (カメラの移動) 
Camera Rotation (カメラの回転) 
You can manipulate the camera around your ship in any way you please by holding down the left mouse button in empty space around your ship and drag it from side to side and up and down. Try this now. The view will stay centered on your ship.
カメラは、あなたの船の周囲を自由に動かすことができます。宇宙空間で、船の周囲の何もないところで左マウスボタンをクリックし、そのまま左右に動かすと、カメラが回転します。やってみましょう。カメラの中心はあなたの船です。
宇宙空間の何もない場所で、左マウスボタンを押したまま、上下に動かすとカメラも上下に回転します。
Zooming (ズーム) 
You can zoom the camera by using the scroll wheel. If you are not equipped with such a device, you can also hold down both mouse buttons and move the mouse up and down.
宇宙空間の何もないところで左マウスボタンと右マウスボタンを両方ともクリックし、そのまま上下に動かすと、カメラのズームを変えることができます。ホイールボタンがある場合は、それを使ってズームさせることもできます。
Ship Movement (船の移動) 
Commands (コマンド) 
You are the ship's captain. You issue orders, which your crew must follow. This can be done by using the HUD at the bottom of your screen and by using the right mouse button to bring up the contextual menu on objects in space.
あなたは船の艦長であることを忘れてはいけません。あなたが指示を出し、他の人はそれに従います。船はあなたの指揮下にあり、指示を待っています。指示を出すには、画面下部の HUD と、宇宙空間の中でオブジェクトを右マウスボタンすると表示されるコンテキストメニューを使います。
- The Head Ups Display(HUD)という吹き出しが下に出ます
- しかし、HUDとはあんまり使われていないようです。
Commanding your ship (船に指示をする) 
There are various commands at your disposal the most useful of which are Approach and Orbit.
様々なコマンドが用意されていますが、中でも次の 2 つは非常に重要です。[Approach(接近)]と[Orbit(旋回)]です。
The Approach Command (接近コマンド) 
Approach allows you to approach any selected object in space. You will continue to approach until you harmlessly bounce off it.
[Approach(接近)]を使用すると、宇宙空間内のオブジェクトに近付くことができます。そのままにしていると、ゆるやかに跳ね返ります。
The Orbit Command (周回コマンド) 
In many situations orbiting is a viable tactic. This will order your ship to orbit an object at a certain range. You can select from a few pre-defined ranges or you can enter your own value.
[Orbit(旋回)]は、多くの場面で有効な戦術です。旋回の指示を出すと、船は一定の距離でオブジェクトの周囲を旋回します。あらかじめ設定された距離から選ぶことも、自分で値を入力することもできます。
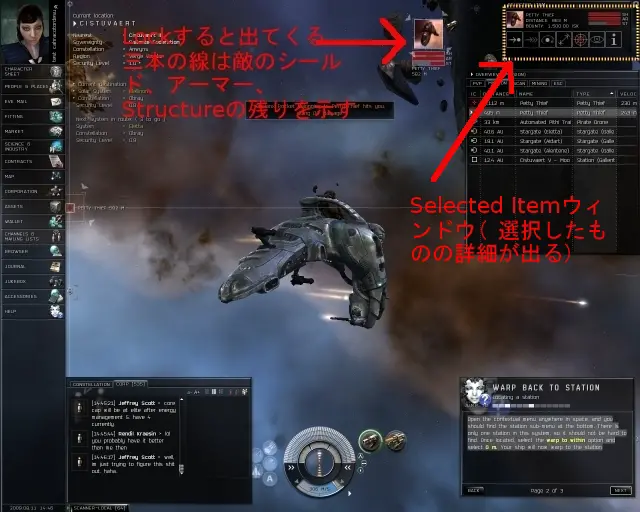
Slected Items (選択されたアイテム) 
If you have an object in space selected it will show up in the Selected Items section above the overview. To do so, click on any item in space. Here you can also issue orders such as Orbit, Approach, or Target.
アイテムが選択されているとき、オーバービューの上の[Selected Item(選択されたアイテム)]セクションにそのアイテムが表示されます。ここで、Orbit(旋回)、Approach(接近)、Lock Target(ターゲットをロック)などの指示を出すことができます。
Issue a command (指示を与える) 
Now, let's issue a command to your ship to approach an object in space. Use the camera to locate a nearby asteroid. Then, Right-click on it to bring up the contextual menu. Select the Approach command. Notice that once you have given your ship an order, it will immediately start following it.
では、あなたの船に指示を与えてみましょう。宇宙空間にあるオブジェクトに接近してみます。オブジェクトを決め、右マウスボタンをクリックしてコンテキストメニューを表示します。[Approach(接近)]または[Orbit(旋回)]を選択します。船は指示を受けるとすぐにそれに従って動作を開始します。
Full stop (停止) 
Now issue a Stop command. Press Ctrl + Spacebar on your keyboard to stop. You can also click on the small triangle on the left side of your speedometer.
では、Stop(停止)の指示を与えてみましょう。停止のためには Ctrl とSpacebar を同時に押します。あるいは速度計の左端の小さい三角形を押すことでも停止できます。
Stop the Ship! という吹き出しが出ます。しかし、コントロールキーとスペースバーを同時に押す、という方が良く使われます
Basic Combat (基本的な戦闘) 
Combat (戦闘) 
Since combat is a frequent occurrence in a capsuleer's life, it is generally advisable to be aware of your surroundings. You may have already noticed that you aren't alone in this training area...
戦闘はカプセル乗りの人生において日常的なことであり、周辺に気を配ることは基本的な忠告です。たぶんあなたはこのトレーニングエリアに一人きりではない事に気がついているかもしれません…
Enemies about (敵について) 
An enemy has passed unnoticed through our security grid! You must eliminate this threat. Locate the enemy - he should be pretty close, and is marked by a red cross.
私たちの目をかいくぐった敵がこっそりと通って行きました。この敵を排除して下さい。敵はすぐ近くにいて、赤い十字で示されています。
Up close and personal (近づく) 
Once you have located the enemy you need to get in proper range. Right-click the red cross either in space or on the overview and select "orbit" - "500m" from the contextual menu.
敵の場所を把握したら、適切な距離に近づく必要があります。空間上あるいは Overview にある赤い十字を右クリックして出てくるコンテキストメニューから "Orbit" - "500m" を選んでください。
Target Located, Lock (ターゲット捕捉、ロック) 
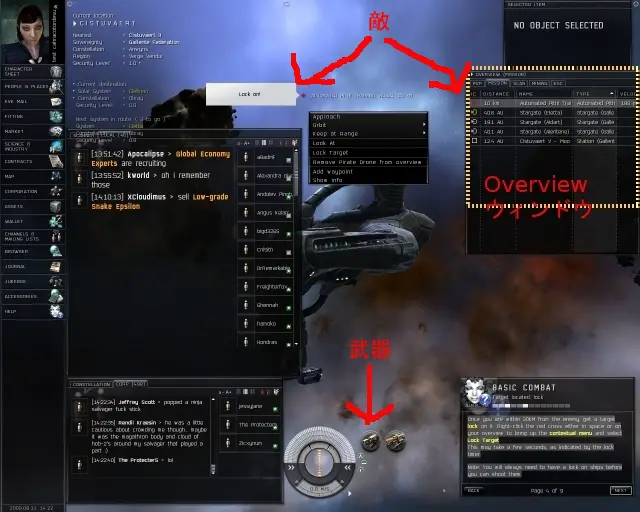
Once you are within 30KM from the enemy, get a target lock on it. Right-click the red cross either in space or on your overview to bring up the contextual menu and select Lock Target This may take a few seconds, as indicated by the lock timer.
Note: You will always need to have a lock on ships before you can shoot them.
敵から30km以内に入ったら、ターゲットをロックしましょう。空間上あるいは Overview 上にある赤い十字を右クリックして出てくるコンテキストメニューから "Lock Target"を選びます。ロックするには数秒かかり、オブジェクトの隣りにタイマーが表示されて、ロックが完了するまでのカウントダウンが表示されます。
注意: 敵を撃つ前には必ずロックする必要があります。
Lock On!という吹き出しが敵に出ます
Overview上をコントロールキーを押しながら左クリックすることでもロックできます
ターゲットがロックされるまでには一定の時間がかかり、その長さはあなたの船とターゲットするオブジェクトの特性によって変化します。
Activate your weapon (武器を起動) 
Weapons and other modules are commanded like all other parts of the ship. By activating them, you issue a command that will not stop unless told to, or until the target has been neutralized. Activate the weapon on your ship now by clicking on it with the left mouse button. Notice it will turn green upon activation. You only have to press it once. Pressing again will deactivate the module.
武器などのモジュールは、船の他の部分と同じように操作できます。起動されたモジュールは、停止するように指令するまで、またはターゲットが無力化されるまで停止しません。ハイライトされている船の武器を起動しましょう。それには、これを左マウスボタンでクリックします。起動すると緑色になります。クリックするのは一度だけにしてください。もう一度クリックすると停止します。
- この武器は練習用のため弾が必要ありませんが、実戦用には別に弾が必要になります
- 二つ並んでいるボタンのうちの右側は採掘用です。敵には撃てません
enemy destruction (敵の破壊) 
In a short while the shield, armor and structure of your enemy will deplete and he will be neutralized, leaving behind some of his valuables.
しばらくすると、敵はシールド、アーマー、ストラクチャが弱っていき、やがて破壊されて何らかの値打ちがあるものを後に残します。
- 上部に出てくる敵の三本の線が全部赤になったら破壊です。上からシールド、アーマー、ストラクチャ(Hullとも言います)を示します。
Wrecks and loot (残骸を漁る) 
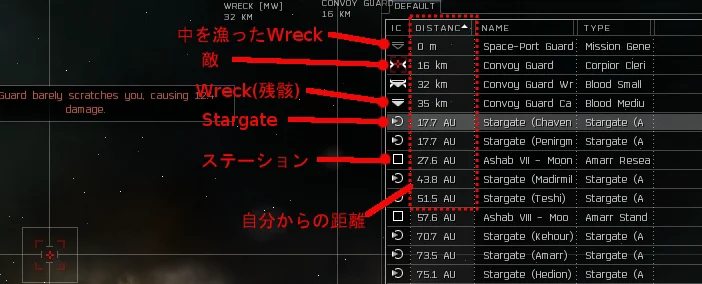
Ships leave behind wrecks that can be scavenged. To do so, order your ship to approach the wreck. You can open the wreck when you're within 1500 meters.
Wreck(残骸)となった船からは戦利品を回収することができます。それには、船を残骸に近付ける必要があります。残骸を開くには、2500 メートルまで近付く必要があります。
Open a Wreck (残骸を開く) 
To open the wreck, bring up the contextual menu and press Open Cargo. This will open a window, which will contain any items the enemy was carrying.
Wreck(残骸)を開くには、右マウスボタンを使ってコンテキストメニューを表示し、[Open Cargo(カーゴを開く)]をクリックします。ウィンドウが開き、敵が持っていたアイテムが表示されます。
Move to Your cargohold (あなたのカーゴに移動させる) 
Open your Cargohold by pressing the Cargohold button on the HUD. You can now drag and drop the items from the wreck to your Cargohold.
Once you have looted the wreck, close the Cargohold window.
HUD にあるカーゴホールドのボタンをクリックして、カーゴホールドを開きます。これで、残骸からあなたのカーゴホールドにアイテムをドラッグしてドロップできます。
Wreckからカーゴに移したらカーゴホールドウィンドウを閉じましょう。
warp back to station (ステーションにワープで戻る) 
Head to the station (ステーションに向かう) 
We will need to head to the station now, where we will store the items we acquired from the pirate.
そろそろ Station(ステーション)に向かいましょう。海賊から手に入れたアイテムを保管する必要があります。
Locating a station (ステーションの場所) 
Open the contextual menu anywhere in space, and you should find the station sub-menu at the bottom. There is only one station in this system, so it should not be hard to find. Once located, select the warp to within option and select 0 m. Your ship will now warp to the station.
宇宙空間のどこでも右クリックしてコンテキストメニューを開くと、一番下にステーションのサブメニューがあります。このシステムにはステーションは 1 つしかないので、目的地は簡単に決まります。ステーションを選んだら、[Warp to Within(ワープ範囲)]を選択し、[Within 0m(0 m 以内)]を選びます。これにより、ステーションの場所まで船がワープします。
Docking (ドッキング、入港) 
We need to dock, so Right-click on the station to bring up the contextual menu. Select the Dock option to initiate the docking procedure.
Docking(入港)する必要があるので、ステーションを選んで右マウスボタンでクリックし、コンテキストメニューを表示します。[Dock(入港)]を選ぶと、ステーションがあなたの船を入港させてくれます。
- 船をステーションに Dock(入港)してから、次に進んでください。
- いきなりDockを選んだ場合、ステーションまでwarpしてDockingまで自動的にやってくれます
In Station (ステーションの中にて) 
Storage (ハンガー) 
In the station, you can store all your worldly belongings. You should move the items you acquired from that nasty pirate to your hangar. Open up the hangar by pressing the Items Neocom button highlighted.
ステーションにはあなたのもの全てを保管できます。えげつない海賊から奪ったアイテムをあなたのハンガーに移しましょう。ハンガーを開くには Neocomのハイライトしている Item ボタンを押します。
Oopen your cargohold (カーゴを開く) 
To open the ship's Cargohold in station, Double-click on the ship itself, or bring up the contextual menu and press Open Cargohold.
船のカーゴホールドをステーションの中で開くには、自船を右クリックして、"Open Cargohold(カーゴを開く)"を選択してください。
もし船のウィンドウがない場合はNeoComの Ships ボタンを押してください
Move your items to your hanger (アイテムをハンガーに移す) 
Now drag and drop the items from your Cargohold to your items hangar. They are completely secure while they are stored in a station hangar.
Once you have moved your items you can close the Cargohold.
船のカーゴホールドから、アイテムハンガーのウィンドウへと鉱石(Tritanium)をドラッグしてください。これでアイテムは安全です。
アイテムをカーゴからアイテムハンガーに移したらカーゴホールドを閉じてください。
Skill Training Queue (スキルトレーニングキュー) 
Skill Training queue (スキルトレーニングキュー) 
The Training Queue can help you set up a sequence of skills that train in order.
Skill Training Queue(スキルトレーニングキュー)を使うと、スキルを設定して順番にトレーニングすることができます。
Open the queue (キューを開く) 
To open the queue first open the Character Sheet, and then open the skill section.
キューを開くには、まずCharacter Sheet(キャラクターシート)を開き、次に[Skill(スキル)]セクションを開きます。
The skill Training queue (スキルトレーニングキュー) 
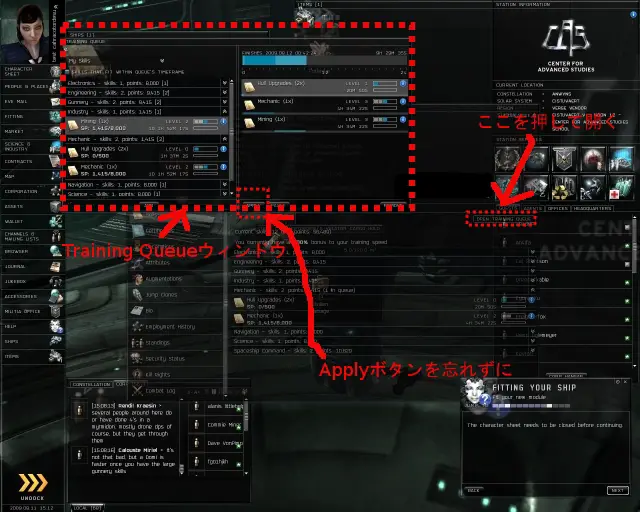
Open the queue by pressing the Open Training Queue button. This brings up the queue window.
[Open Training Queue(スキルキュー)]ボタンをクリックしてスキルキューを開いて下さい。キューウィンドウが表示されます。
List of Skills (スキル一覧) 
The window contains two lists. The one on the left contains all your skills in the character sheet while the right is the queue. You can drag and drop skills from the left to the right section to add to the queue.
ウィンドウには 2 つの一覧があります。左側はキャラクターシートに載っているあなたの全てのスキル、右側はキューです。左側からスキルをドラッグして右側にドロップすることで、キューに追加できます。
Moving skills around (スキルの順番を変える) 
You can move skills around in the queue by dragging and dropping up and down. This will change the order in which the skills are trained.
キューの中のスキルは、ドラッグアンドドロップによって位置を変更できます。これによってスキルを習得する順番が変わります。
Skill Training - 24 hour limit (スキルトレーニング - 24時間制限) 
Your current skill in training will be listed at the top of the queue. You can add up to 50 skills into the queue, but the last skill has to start within 24 hours.
現在トレーニング中のスキルがあると、キューの一番上に表示されます。キューにはスキルを 50 まで追加できますが、最後のスキルトレーニングが 24 時間以内に始まる必要があります。
Adding skills to the queue (キューにスキルを追加する) 
You should add some skills to the queue. Select two skills of your choice and drag and drop them into the queue. You can see immediately that the time line bar at the top fills up, indicating the amount of training time allocated.
スキルをキューに追加してみましょう。スキルを 2 つ選び、キューにドラッグアンドドロップします。すぐに、一番上にあるタイムラインバーに残り時間が表示されます。
Another level (別のレベル) 
You can train multiple levels of a skill in the queue. Keep in mind though that you have to train them in order - level one must be trained before you can start level 2! These are indicated by the blue box on the skill. To train multiple levels of a skill, just drag that skill again from the left side onto the queue.
一つのスキルの複数のレベルをキューに設定することもできます。ただし、順番にトレーニングしなければなりません。つまり、レベル 2 の前にレベル 1、などです。このような組み合わせは、スキルに青いバーで示されます。複数のレベルをトレーニングするには、左側のセクションからキューにもう一度ドラッグするだけです。
Remove skills from the queue (キューからスキルを削除する) 
To remove a skill, you can either select it and press the remove button at the bottom of the screen, or simply drag it back to the left section.
トレーニングキューからスキルを削除するには、スキルを選択し、画面下部の[Remove(削除)]をクリックするか左側のセクションにドラッグします。
Skills from your hanger (ハンガーからスキルを追加) 
If you have newly acquired skills, you can drag them directly from your hangar or cargohold to the queue. This will add them to the Character Sheet as well.
新しく手に入れたスキルブックは、ハンガーやカーゴホールドから直接キューにドラッグできます。すると、スキルはキャラクターシートにも追加されます。
Apply your choices (選択したスキルキューを適用する) 
Once you are happy with your skill training plan for the next 24 hours, press the apply button to save and activate the queue. Skills will train automatically until the queue is empty.
今後 24 時間のスキルトレーニングの計画ができあがったら、[Apply(適用)]ボタンをクリックします。これでキューの準備は完了しました。全てのトレーニングが終わるまでスキルの習得が行われます。トレーニングが終わる前に次のスキルをキューに追加することもできます。
Skill Prerequisties (スキルの前提条件) 
Keep in mind that skills have prerequisites which you might not have met. If this is the case, you will not be able to add them to your queue. You must finish training all of a skill's prerequisites before adding it to the queue.
You can close the character sheet and the training queue window now.
スキルによっては前提条件があり、それを満たしていないことがあるので注意が必要です。そのような場合、すぐにそのスキルをキューに追加することはできません。順番に、必要な全てのスキルを習得してからトレーニングする必要があります。
キャラクターシートとトレーニングキューウィンドウを閉じてください
Fitting your ship (船をFitting(装着、儀装)する) 
Fit your new module (新しいモジュールを装着する) 
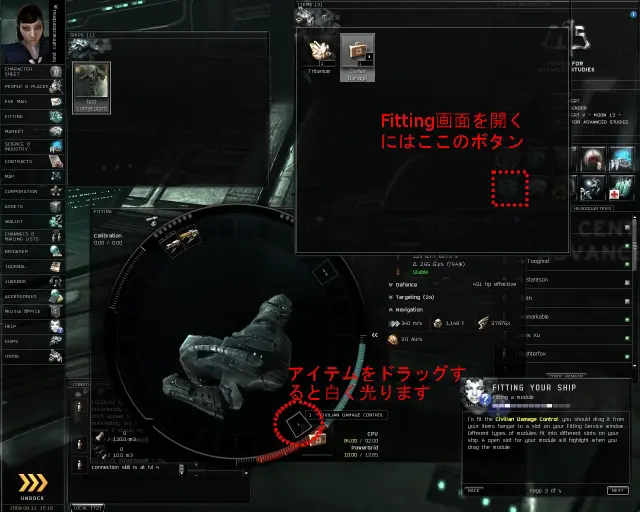
You should fit the Civilian Damage Control module to your ship. To do so, open up the Fitting Service, by pressing on the highlighted button on the station services panel.
Civilian Damage Control I モジュールを装着してみましょう。それには、ステーションのサービスパネルでハイライトされているボタンをクリックして、Fitting(整備)サービスを開きます。
Ship Information (船の情報) 
The Fitting Service window gives you a comprehensive overview of your ship's configuration and abilities. Here you can fit your modules and get all the necessary information about your ship.
Fitting(整備)画面は、船の機能を決定する中心的な役割を果たします。ここでは、モジュールを装着したり、船に関して必要なあらゆる情報を入手することができます。
Fitting a module (モジュールを装着) 
To fit the Civilian Damage Control, you should drag it from your items hangar to a slot on your Fitting Service window. Different types of modules fit into different slots on your ship. A open slot for your module will highlight when you drag the module.
Civillian Damage Control I をFit(装着)するには、アイテムハンガーからFittingウィンドウのスロットにドラッグします。Module(モジュール)ごとに装着できるスロットが異なります。モジュールが装着できるスロットは、モジュールをドラッグした時にFittingウィンドウで白くハイライトされます。
skills help with fitting (スキルはFittingを助ける) 
As you know, skills are the cornerstone of your life. It is important that you train skills that help you fit your ship the best way possible. Here are some basic skills that will aid you in that process. You should add them to the training queue now.
You may close the Fitting Service window now. We have a wealth of further information on ship fitting at our wiki
Repair Systems
Operation of armor/hull repair modules. 5% reduction in repair systems duration per skill level.
Shield Operation
Skill at operating a spaceship's shield systems, including the use of shield boosters and other basic shield modules. 5% reduction in shield recharge time per skill level.
スキルは EVE での生活に不可欠なものです。可能な限り、あなたの船に合うスキルをトレーニングすることが大切です。そのプロセスを補助してくれる基本的なスキルがあります。それらをトレーニングキューに追加しましょう。
- Repair SystemsとShield Operationという二つのスキルブックが自動的にアイテムハンガーに増えます
- スキルブックをスキルキューに登録するには右クリックして Inject Skill を選んでください
- 前提スキルが必要の場合、 Information ウィンドウが開き、"To Lean that skill requires having already learnd following skills: Industry level 1"などと表示されます。この場合、Industry のスキルのレベルが1必要です、という意味です
[Fitting(整備サービス)]ウィンドウとアイテムハンガーを閉じてください。
Agents (エージェント) 
Agent Missions (エージェントミッション) 
At this point you must be craving more excitement. Agents are always looking for pilots to carry out their missions.
さて、あなたは今もっと刺激を求めていると思います。エージェントはいつもミッションを遂行するパイロットを探しています。
Your first agent (最初のエージェント) 
Select the Agents tab under station services on the lower right side of your screen. Double-click on the agent's name to start a conversation with him. Read the details he provides and press the Accept button to accept his mission when ready.
ステーションサービスの下にある、"Agent(エージェント)"タブを選択してください。エージェントの名前をダブルクリックすると、そのエージェントと会話できます。彼からの依頼を読み、Accept(承諾)ボタンを押してミッションを受けましょう。
- Declineボタンはミッションを断ります。Delayボタンはミッションをあとでもう一度受けるか断るかを決めることが出来ます。
- チュートリアルなのでいきなり Accept していますが、実際には受ける前に内容を確認しましょう
Mission Jounal (ミッションジャーナル) 
When you have accepted the mission, open the Journal in the Neocom. The Journal keeps track of your offered and accepted missions.
ミッションを受けたら、NeoCom 内の Journal(ジャーナル) ボタンを開いてください。ジャーナルでは、依頼されたミッションと、実際に引き受けたミッションを確認できます。
ジャーナルの読み方
- Mission briefing
- ミッションの説明です。読まなくても大丈夫ですが、背景の物語が書かれているので読んでみると面白いですよ
- (ミッションの名前) Objectives
- ミッションの目的が示されます。ここが一番重要なので、まずはここだけを見るようにしてください
- Reward
- 報酬です。もらえるCredits(お金)とLoyalty Point(LP)が示されます。LPに関しては最初は気にする必要はありません
- Bonus Reward
- ある決められた期限内にミッションを終わらせるともらえるボーナス報酬です。この期間を過ぎてもボーナスがもらえないだけなので問題ありません。
Overview and Objectives in the journal (ジャーナルで、概要と目的を確認) 
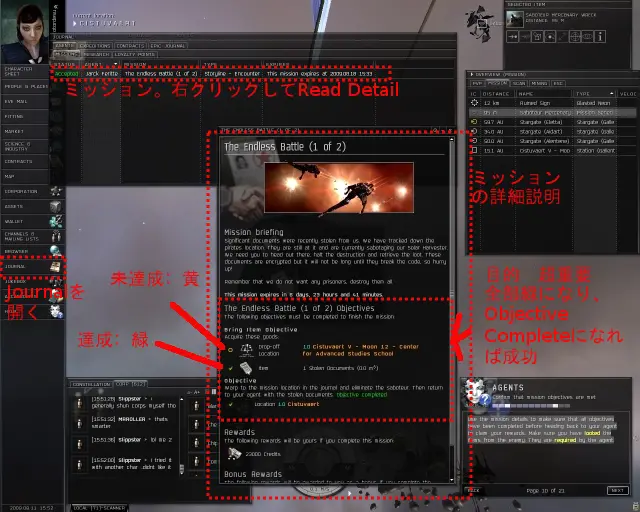
In the Journal, Right-click on the mission name and select read details. When you have accepted a mission always read the details because missions vary greatly from one another.
This information is also available while you are discussing the terms of the mission with your agent.
ジャーナルに記録されているミッションの名前を右クリックし、"Read Details(詳細を確認)"を選択します。ミッションによって内容はかなり異なるので、引き受けたら必ず詳細を確認するようにしてください。
この情報にはミッションの目的も示されています。
Mission Terms (ミッションのゴール) 
Your first mission is to eliminate some opponents and loot the goods they are carrying. When you return the loot to your agent, the mission is completed and you will get your rewards.
最初のミッションは、敵の宇宙船をいくつか撃墜し、敵が船に積んでいる物資を手に入れ、それをエージェントのもとへ持ち帰ることです。ミッションが達成されると、報酬を受け取ることができます。
Bonuses can await us (ボーナスが待っている) 
You should avoid letting a mission expire. The agent will then become less likely to give you another mission. However, if you do extraordinarily well he will give you a bonus!
ミッションは、期限内に達成しなければなりません。期限内に達成できなかった場合は、同じエージェントから次のミッションをもらえなくなるかもしれません。逆に、素晴らしい結果を出せばボーナスが出ることもあります。
Undock and start the mission (出港、そしてミッションを開始) 
When ready, undock your ship.
準備ができたら、船を出港させます。
Bookmarks for Agent missions (エージェントミッションのブックマーク) 
To find where you have to go, Right-click anywhere in space. Locate the Agent missions: section and select "The Endless Battle". In the sub-menu select Encounter and select Warp to Location Within 0 m.
ミッションの目的地へ行くには、宇宙空間を右クリックすると表示されるドロップダウンメニューからエージェントミッション(Agent Mission)の下にある先ほど受けたミッション(ここでは"The Endless Battle")を選択し、次にEncounter(攻撃)、最後にWarp to Location Within 0m(0mワープ)を選択してください。そこに指示されている場所へワープします。
The Items Acquired (アイテムを取得) 
When you arrive, locate the enemy - as with all enemies he is marked with a red cross. Remember to be within the range of your weapons and to target lock him. When you have eliminated the enemy and looted his belongings, open the Journal.
場所に到着したら、敵を探してください。全ての敵は赤い十字で示されます。あなたの武器に適した距離にApproachあるいはOrbitで移動し、ターゲットをロックすることを思い出してください。敵を倒し、敵の所持品をカーゴに移したら、 Journal を開いてください。
- Wreck(残骸)からものを取る(loot)には2500m以内に近づくことを忘れないでください
Confirm that mission objectives are met (ミッションの目的が達成されたか確認) 
Use the mission details to make sure that all objectives have been completed before heading back to your agent to claim your rewards. Make sure you have looted the items from the enemy. They are required by the agent.
報酬を受け取りにエージェントの元へ引き返す前に、ジャーナルで全ての目的が達成されたか、もう一度確認して下さい。Agentから要求されたアイテムを奪ったがどうか確認してください。
Jounalで Read Details を開き、Objectiveという部分に緑色で Objective Completed と表示されていたらミッション達成です
Dock at the agent's station again (再びエージェントがいるステーションにDock) 
Warp back to the station, by Right-clicking in space and selecting the station. This time use the Dock option. This will bring you directly to the station and automatically dock you.
エージェントのいるステーションにワープし、入港するには、今回は宇宙空間を右クリックし、ドロップダウンメニューから入港(Dock)を選択してみましょう。こうすればステーションへのワープしてDockも自動的に行ってくれます。
Agentと同じSystem(星系)にいるのであれば、宇宙空間を右クリックし、Agent MissionからObject & Agent Base - dock を選んでもDockできます。これはステーションがいっぱいある場合にとても有効です。
Claim the rewards (報酬を受け取る) 
Start a conversation with the agent again. Tell him that you have completed the mission. The mission will only complete, if the item required is in your hangar or cargohold.
エージェントと(ダブルクリックをすることで)再度話をし、Complete Missionボタンを押してすべての目的を達成したことを報告してください。証拠のアイテムを持っていれば、報酬を受け取ることができます。
Get another mission (別のミッションを行う) 
Press Continue in the agent conversation window. You should get another mission. Accept his next mission.
"Request Mission"ボタンを押すと、また別のミッションを受けることが出来ます。Acceptボタンを押してミッションを受けましょう。
Closeボタンを押すとミッションを受けずにウィンドウを閉じます。
Courier Missions (配達ミッション) 
今度のミッションはCourier(配達)ミッションです。敵を倒す必要はありません
To complete a courier mission you must deliver items to another station. When your delivery has been confirmed, you will get your rewards. Open the Items Hangar as well as your Cargohold.
配達ミッションでは、ある特別なアイテムを、別のステーションへ届けます。配達が確認されると、報酬を受け取ることができます。アイテムハンガーとカーゴホールドを開いてください。
Move the courier items to our ship (船に配達用アイテムを運び入れる) 
Drag and drop the Encryption Code Book from your Hangar into the Cargohold. Make sure you have the item in the Cargohold of your ship before leaving so you don't have to come back for it. Undock when you are ready to leave.
配達アイテムをハンガーからカーゴホールドへドラッグ&ドロップしてください。この作業をせずにアイテムを置き忘れてしまうと、エージェントから報酬を受け取れないばかりか、笑い者にされてしまいます。では、Undock(出港)を選択し、出発しましょう!
Finding our destination (目的地を探す) 
As you have to deliver to another solar system, it is best to use the Journal for direction.
Courier ミッションで違う恒星系に移動する場合には、ジャーナルで位置を確認します。
Set Destination to Drop-off location (輸送先の場所を目的地として設定する) 
Open the Journal and Right-click on the mission and bring up the details of the mission. To set a destination bring up the contextual menu on the Drop-off Location and select Set Destination.
ジャーナルの[Agent(エージェント)]タブを選択し、[Mission(ミッション)]の[Read Detall(詳細を読む)]を開きます。Drop-off Location (輸送先) を右クリックします。次に、右クリックのメニューから[Set destination(目的地の設定)]を選択します。
今回はチュートリアルのため Pickup Location(輸送元)がさっきのステーションでしたが、実際のミッションでは輸送元が違う場所の場合もあります。その場合は Pickup Location を右クリックしてください
- Autopilotを使わない、Systemの移動の仕方
- Set Destinationで、目的地を設定します(行き先が分かっているなら設定する必要はありません)
- Set DestinationはAssetなどいろいろな場所からできます。右クリックで試してみてください
- OverViewにあるStargateのうち、黄色いマークのStargateがあるのでそこを右クリックしてWarp to Within 0m
- 黄色いマークはほかにもある可能性があるのでStargateであることを確認すると良いです
- Stargateについたら、Overviewかあるいは画面上のStargateを右クリックして Jump を選びます
- Jumpは2500m以内でしか使えないことに注意
- 別のSystemに移動します。左上の "Current Location" が変わるはずです
- Set Destinationで、目的地を設定します(行き先が分かっているなら設定する必要はありません)
Activating the autopilot (オートパイロットを起動) 
Now you need to activate the Autopilot on the HUD and you will be taken automatically to the correct solar system. Just sit back and enjoy the ride!
次にコントロール装置でオートパイロット(Autopilot)を起動することで、自動的に目的の恒星系へ移動できます。
Autopilotを起動するには左下の A のマークをクリックしてください
目的地に到着したら、"Next"をクリックしてください。
Dock at the station (ステーションにDock) 
When the autopilot has disengaged, use the agent mission bookmarks as before to Dock at the correct station by bringing up the contextual menu anywhere in space, find the drop-off location sub-menu and select the Dock option.
目的の恒星系に到着すると自動的にAutopilotが解除されます。Autopilotが解除されたら、以前と同様に宇宙空間を右クリックして呼び出すコンテキストメニューから、エージェントミッションブックマークを使って、目的のステーションへDock(入港)してください。
Deliver the goods (アイテムを届ける) 
Talk to your agent and let him know you have completed the mission. If he is satisfied with the result, the courier items will be taken from the Cargohold and you will get the rewards.
エージェントと話をし、ミッションを完了したことを報告してください。成功と認められれば、配達アイテムはカーゴホールドから自動的に取り出され、報酬を受け取ることができます。
現在ミッションを受けているエージェントとは、Agents of Interestという部分に表示されます
Refining Skill (Refining スキル) 
Good job! As an extra reward, here is a skill you may need later on.
よくできました ! 追加の報酬として、後で役立つスキルをさしあげます。
Refining
Skill at using refineries. 2% reduction in refinery waste per skill level.
Next Steps (さて、次は?) 
Joining a player corporation (プレイヤーの会社に入る) 
Although you can do many things alone, working together is the best way to get ahead in this world. Joining the forces of a player run corporation will eventually be essential for your growth. Using the Recruitment section in the Corporation Neocom window you can search for prospective corporations looking for new recruits.
一人でもできることはたくさんありますが、この世界で生きていくためには互いに協力することが本来の姿です。やがては、プレイヤーが運営している会社、コーポレーションに加わることがあなたの成長にとって避けられなくなるはずです。Neocom の[Corporation(コーポレーション)]ウィンドウにある[recruitment(リクルート)]セクションで、人員を強化しようとしている将来性豊かなコーポレーションを見つけることができます。
- ここで出てくる会社のほとんどは外資系です。日本人の会社を探したいのであればまず各社が公開している公開チャンネル(チャット)に入って聞いてみるのがいいでしょう。Chat?でチャンネルへの入り方が分かります。
Evelopedia 
The EVElopedia is a vast information database on everything you could possibly imagine. It is written by your fellow capsuleers, to ensure the most correct and up to date information is always readily available.
Head here for more information on any topic you so desire.
EVELopedia は、あなたが思い付きそうなこと全てを網羅する巨大な情報データベースです。あなたと同じようなカプセル乗りが、正確で最新の情報を提供しようと書き込んでいます。
何かを知りたいと思ったら、ここにアクセスしてみましょう。
http://wiki.eve-online.com
Finishing the tutorial (チュートリアルを終わる) 
You are now ready to join this world of piracy and capitalism. Remember that there are other tutorials on various subjects, accessible through the Help Neocom button.
Good luck on your ventures, and congratulations on your pilot's license!
さあ、これであなたもこの海賊と資本主義の世界に入っていくことができます。他にも様々なテーマのチュートリアルを NeoCom の[Help(ヘルプ)]ボタンから利用することができます。ともあれ、パイロットライセンス取得おめでとうございます。あなたの冒険の幸運をお祈りしています。
Carrer Advancement Tutorial 
Opening it up 
2連ミッション終了と同時にCAREER FUNNELウインドウ「ADVANCING NEW EDEN'S CAREES」が立ち上がります。(Help(F12)を押して出る"EVE HELP"の下にある "SHOW CAREER AGENT" ボタンを押しても出ます。)
overview 
The Career Advancement window shows you the three nearest Career Agents and helps you get to them. These agents will offer you a series of missions which teach you more about particular careers in EVE, Industry, Business and Military.
You can approach as many of the agents as you want and ask them for missions.
Career Advancement ウィンドウは、一番近くの Career Agentの場所を教えてくれます。これらのAgentは生産(Industry)系、トレード(Business)系、戦闘(Military)系というEVEの基本的なキャリアに基づいたミッションをくれます(いわゆる10連ミッション)。
Getting there 
The orange text is the agent's location. You'll need to make your way there to get missions from the agent. When you are in a different solarsystem, the button below the location should say Set Destination. If this is the case, press the button and undock.
オレンジ色の文章が、Agentのいる場所です。ミッションを受けるにはAgentがいる場所にいく必要があります。もしもあなたが違う恒星系にいる場合、場所の下にある "Set Destination" ボタンを押すことで目的地を設定し、そのエージェントたちの居る星系の座標がオートパイロットに入力されます。もしそうしたい場合、Set Destinationのボタンを押し、Undockしましょう。
Getting There 
If you have undocked and the agent button says Set Destination, activate the autopilot to make your way to the agent's solarsystem.
When there the button should change to say Dock at agent's station. Press it and wait for the ship to dock.
ステーションの外に出てオートパイロットを起動しましょう。しばらく待てばエージェントたちのいるステーションのある星系に着きます。
到着したら、ボタンが "Dock At Agent's Station"に変わります。そのボタンを押し、船がDockするまでしばらく待ちましょう。
エージェントのいるステーションに移動して話し掛け ミッションを受けてください。三人のエージェントはそれぞれの10連ミッションをくれます。
Striking up a conversation 
When you have made your way to the agent's station the button should say Start Conversation. Press it now and the agent should ask you to perform a mission for him.
Agentがいるステーションにdockしたら、 "Start Conversation"にボタンが変わります。そのボタンを押して、ミッションを要請しましょう。
Good luck 
Feel free to close the Career Advancement window when you have a mission. You can always open it again with the Show Career Agents button in the Help window (F12)
ミッションを受けたら、Career Advancementウィンドウを閉じましょう。このウィンドウはHelpウィンドウをからいつでも呼び出すことができます。
- Help(F12)で、でるEVE HELPのTUTORIALSタブの中にある各項目は出来るだけ読んでおきましょう。報酬としてスキル本が貰えます。

 新規
新規 編集
編集 添付
添付 一覧
一覧 最終更新
最終更新 差分
差分 バックアップ
 凍結
凍結 複製
複製 名前変更
名前変更 ヘルプ
ヘルプ