CMS構築 Xoops
CMS(コンテンツマネジメントシステム)を提供する。
CMSとは、ブログやカレンダーなどを纏めて管理提供できるツール。
Xoopsはオープンソースで配布されており、豊富なプラグインをインストールすることで自由度の高いHPを作ることが出来る。
やりたいこと
IE等のWebブラウザから、 CMS(コンテンツマネジメントシステム)を提供可能とする。
条件
| 使用OS | CentOS5.5 64bit |
| アプリ | Apache+PHP+MySQL (CentOS付属) |
| 文字コード | utf-8 |
ファイル入手
- XOOPS Cube日本サイト
http://xoopscube.jp/
- 今回は以下ファイルを入手
Package_Legacy_2_2_0_Alpha_4.zip
http://sourceforge.net/projects/xoopscube/files/legacy/legacy%202.2.0/Package_Legacy_2_2_0_Alpha_4.zip/download
★当ファイルはalpha版(開発途中)です。正式運用時はXoopsホダ塾をお勧めします
MySQLデータベース作成:
(1)MySQL データベース作成
【telnet】
$ su
パスワード:
- MySQLにログイン
# mysql -u root -p
Enter password:
Welcome to the MySQL monitor.  Commands end with ; or \g.
Your MySQL connection id is 390
Server version: 5.0.77 Source distribution
Type 'help;' or '\h' for help. Type '\c' to clear the buffer.
- 「xoops」データベース作成
mysql> create database xoops ;
Query OK, 1 row affected (0.00 sec)
- 「xoops」ユーザ作成
mysql> grant all privileges on xoops.* to xoopsuser@localhost identified by 'xoopspass';
Query OK, 0 rows affected (0.05 sec)
- 終了
mysql> exit
Bye
#
- データベース接続に問題が無いか確認
# mysql -u xoopsuser -pxoopspass xoops
Reading table information for completion of table and column names
You can turn off this feature to get a quicker startup with -A
Welcome to the MySQL monitor.  Commands end with ; or \g.
Your MySQL connection id is 221
Server version: 5.0.77 Source distribution
Type 'help;' or '\h' for help. Type '\c' to clear the buffer.
mysql> exit
Bye
インストール
(1) ファイル転送
【FTP】
ftp にて、ユーザエリア「/home/hogehoge」にPackage_Legacy_2_2_0_Alpha_4.zipをアップ
(2)ファイルを展開
【Telnet】
- パッケージがあるか確認
# ls -l
-rw-r--r-- 1 hogehoge hogehoge 12100674  7月 26 04:31
                                         Package_Legacy_2_2_0_Alpha_4.zip
- パッケージを解凍
# unzip Package_Legacy_2_2_0_Alpha_4.zip
Archive:  Package_Legacy_2_2_0_Alpha_4.zip
   creating: docs/
  inflating: docs/CHANGES.txt
     :
- 解凍ファイルがあるか確認
# ls -l
-rw-r--r--  1 hogehoge hogehoge 12100674  7月 26 04:31
                                          Package_Legacy_2_2_0_Alpha_4.zip
drwxr-xr-x  3 root     root         4096  6月  7 22:18 docs
drwxr-xr-x 10 root     root         4096  6月  7 22:18 extras
drwxr-xr-x 15 root     root         4096  6月  7 22:17 html
drwxr-xr-x  6 root     root         4096  6月  7 22:17 xoops_trust_path
(3)html直下にコピー
【telnet】
- ファイルコピー
# cp -R html/ /var/www/html/
- ディレクトリ名変更
# mv /var/www/html/html/ /var/www/html/xoops
- ディレクトリがあるか確認
# ls -l /var/www/html/
drwxr-xr-x 15 root   root   4096  7月 26 04:38 xoops
- utf-8日本語化ファイルコピー
# cp -R extras/extra_languages/ja_utf8/* /var/www/html/xoops
- 所有者変更
# chown -R apache:apache /var/www/html/xoops/
- 確認
# ls -l /var/www/html/
drwxr-xr-x 15 apache apache 4096  7月 26 04:43 xoops
- 権限変更
# chmod 777 /var/www/html/xoops/uploads/
# chmod 777 /var/www/html/xoops/templates_c/
# chmod 777 /var/www/html/xoops/mainfile.php
(4)D3コピー
【telnet】
- ファイルコピー
# cp -R xoops_trust_path/ /var/www/
- ディレクトリがあるか確認
# ls -l /var/www/
drwxr-xr-x  6 root      root 4096  7月 26 04:57 xoops_trust_path
・権限変更
# chmod 777 /var/www/xoops_trust_path/cache/
動作確認
【Web】
以下URLにアクセス
http://192.168.0.10/xoops/ → Xoops 設定画面が表示
設定
(1)XOOPS 設定
【Web】
以下URLにアクセス
http://192.168.0.10/xoops/ → Xoops 設定画面が表示
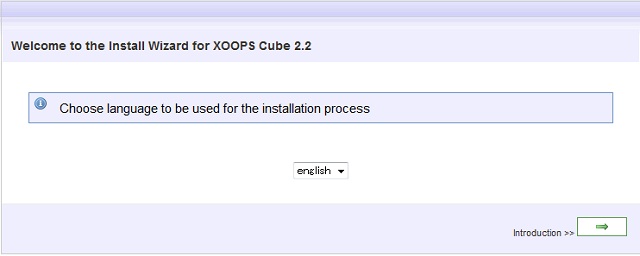
→「ja_utf8」を選択し「→」押下 ★選択を間違えないように!
「データベース、およびパス・URLの設定」画面
→データベースユーザ名 xoopsuser
データベースパスワード xoopspass
データベース名 xoops
「サイト管理者についての設定」画面
→ 管理者ユーザ名を登録
管理者でログイン後必要モジュールをインストール
(2)後処理
【telnet】
- installディレクトリ削除
# rm -rf /var/www/html/xoops/install/
- 書き込み権限の削除
# chmod 444 /var/www/html/xoops/mainfile.php
必須モジュールインストール
(1) 必須モジュール入手
導入すべき必須モジュールとして以下2つを設定する。
- Altsys : 代替システムモジュール(テンプレート管理・ブロック管理/アクセス権限・言語定数管理)
http://xoops.peak.ne.jp/md/mydownloads/singlefile.php?lid=76&cid=1
- Protector : XOOPS2 を様々な悪意ある攻撃から守るためのモジュール
http://xoops.peak.ne.jp/md/mydownloads/singlefile.php?lid=94&cid=1
上記ページの「Zip」ボタンを押してファイルを入手
Altsys :altsys-0.7.zip
Protector :protector-3.4.zip
(2)Altsysモジュールインストール
【FTP】
ftp にて、ユーザエリア「/home/hogehoge」にaltsys-0.7.zipをアップ
【telnet】
- 確認
# ls -l
-rw-r--r-- 1 hogehoge hogehoge 214729  7月 26 06:01 altsys-0.7.zip
- 解凍
# unzip altsys-0.7.zip
Archive:  altsys-0.7.zip
   creating: html/
   creating: html/modules/
   creating: html/modules/altsys/
  :
- htmlとxoops_trust_pathがあることを確認
[root@localhost hogehoge]# ls -l
  :
-rw-r--r-- 1 hogehoge hogehoge 214729  3月 20 13:24 altsys-0.7.zip
drwxr-xr-x 4 root     root       4096  2月  3  2009 html
drwxr-xr-x 3 root     root       4096  3月 20 13:25 xoops_trust_path
- html配下ファイルをxoops配下にコピー
# cp -R html/* /var/www/html/xoops/
- xoops_trust_path配下ファイルをxoops_trust_pathにコピー
# cp -R xoops_trust_path/* /var/www/xoops_trust_path/
【web】
以下URLにアクセス
http://192.168.0.10/xoops/ → Xoops 画面が表示
「ログイン」→「管理者メニュー」→「互換モジュール」→「モジュールのインストール」
で「altsys」があることを確認
「操作」でインストールを実行 → インストール成功を確認
「モジュールの管理」で「altsys」があることを確認
管理者メニューに「ALTSYS」が追加されていることを確認
(3)Protector モジュールインストール
【FTP】
ftp にて、ユーザエリア「/home/hogehoge」にprotector-3.4.zipをアップ
【telnet】
- 確認
# ls -l
-rw-r--r-- 1 hogehoge hogehoge 769825  7月 26 06:01 protector-3.4.zip
- 解凍
# unzip altsys-0.7.zip
Archive:  altsys-0.7.zip
   creating: html/
   creating: html/modules/
  :
- htmlとxoops_trust_pathがあることを確認
# ls -l
drwxr-xr-x 3 root     root       4096 11月 17  2009 html
-rw-r--r-- 1 hogehoge hogehoge 769825  7月 26 06:01 protector-3.4.zip
drwxr-xr-x 3 root     root       4096 11月 17  2009 xoops_trust_path
- html配下ファイルをxoops配下にコピー
# cp -R html/* /var/www/html/xoops/
- xoops_trust_path配下ファイルをコピー
# cp -R xoops_trust_path/* /var/www/xoops_trust_path/
- 書き込み権限付与
# chmod 777 /var/www/html/xoops/mainfile.php
- 確認
# ls -l /var/www/html/xoops/
-rwxrwxrwx  1 apache apache  5332  7月 26 05:13 mainfile.php
- 設定
# vi /var/www/html/xoops/mainfile.php
  if (!defined('_LEGACY_PREVENT_LOAD_CORE_') && XOOPS_ROOT_PATH != '') {
      include_once XOOPS_ROOT_PATH.'/include/cubecore_init.php';
      if (!isset($xoopsOption['nocommon']) &&
                                !defined('_LEGACY_PREVENT_EXEC_COMMON_')) {
          include XOOPS_ROOT_PATH.'/include/common.php';
      }
  }
↓
 if (!defined('_LEGACY_PREVENT_LOAD_CORE_') && XOOPS_ROOT_PATH != '') {
     include XOOPS_TRUST_PATH.'/modules/protector/include/precheck.inc.php' ; ←行追加
     @include_once XOOPS_ROOT_PATH.'/include/cubecore_init.php'; ←修正
     if (!isset($xoopsOption['nocommon']) &&
                               !defined('_LEGACY_PREVENT_EXEC_COMMON_')) {
         include XOOPS_ROOT_PATH.'/include/common.php';
     }
     include XOOPS_TRUST_PATH.'/modules/protector/include/postcheck.inc.php' ;←行追加
 }
- 権限戻し
# chmod 444 /var/www/html/xoops/mainfile.php
- 確認
# ls -l /var/www/html/xoops/
-r--r--r--  1 apache apache  5500  7月 26 06:24 mainfile.php
- 確認
# ls -l /var/www/xoops_trust_path/modules/protector/configs/
-rw-r--r-- 1 root root 0  7月 26 06:19 index.html
- configファイルの所有者を変更
# chown -R apache:apache /var/www/xoops_trust_path/modules/protector/configs/
- 確認
# ls -l /var/www/xoops_trust_path/modules/protector/configs/
-rw-r--r-- 1 apache apache 0  7月 26 06:19 index.html
【web】
以下URLにアクセス
http://192.168.0.10/xoops/ → Xoops 画面が表示
「ログイン」→「管理者メニュー」→「互換モジュール」→「モジュールのインストール」で「Protector」があることを確認
「操作」でインストールを実行 → インストール成功を確認
「モジュールの管理」で「Protector」があることを確認
管理者メニューに「Protector」が追加されていることを確認
モジュールインストール
運用するサイトにあわせ任意にインストール及び設定を行う。
以下、導入してみて結構いいなあと思ったお勧めのモジュール
- piCal 0.93 スケジューラ付カレンダー
http://xoops.peak.ne.jp/md/mydownloads/singlefile.php?lid=89&cid=1
→ 解凍後、moduleとcommonをxoops配下にコピー
遭遇したトラブル
xoops画面でメニュー画面が「???」と表示されて読めない
問題:
xoops画面でメニュー画面が「???」と表示されて読めない
原因:
MySQLで/etc/my.cnfに、utf8設定記述が無い
★my.cnfに utf8設定無くても動くツール多いので、utf8の設定が漏れやすい
謝辞
テキスト作成に当たり、以下サイトを参考にさせて頂きました。ありがとうございます。
http://centossrv.com/xoops.shtml
http://d.hatena.ne.jp/iwa/20090119/1232289230
http://xoops.kudok.com/
http://eve.neverever.xrea.jp/

 新規
新規 添付
添付 一覧
一覧 最終更新
最終更新 差分
差分 バックアップ
 凍結解除
凍結解除 複製
複製 名前変更
名前変更 ヘルプ
ヘルプ