![]()
About Formations & How to Lead Them
Formation Common Sense 101
Before we jump into things, there are a few words that need to be said about formations.
Formations act as a guide for where people should be to best fit the situation. They are very flexible creatures, and should be adapted as needed to fit the situation. Everyone should be familiar with the basic formations, and leaders in particular must have an understanding of what the strengths and weaknesses of each are.
Players should not get wound up in trying to maintain a 100% textbook-perfect formation position 100% of the time. Adapt to the situation as needed.
For the purposes of illustration, I have chosen to depict squad-level formations. This means that you see the dispositions of the various fireteams in relation to the squad leader, but not the actual fireteam members. The same formations, however, can be applied at any level - there are fireteam formations, squad, and platoon ones. You can even mix different formations at different levels - you could have the platoon in a line formation, the squads in column, and the fireteams in wedge. Each level of command has their own formations to set, basically. A PltCo might tell the platoon to get in line formation, and the squad leaders might tell their squads to get in column. Fireteam leaders could then be more specific to their teams if they so desired. It sounds complicated, but with the way the hierarchy breaks down, it's really not difficult to work with.
Formation Notes
Note that in squad formations, the squad leader is positioned so that he can exercise control over the cohesive movements of the entire squad. In a squad, the leading element - the first fireteam, unless otherwise noted - is guiding the movement. In a fireteam formation, however, the fireteam leader is typically leading by example and acting as the guide for his fireteam members to follow.
Also note that the depicted formations, as well as the relative placements of teams, are the standard to follow. The only time these formations will rearrange themselves is when a specific need is identified and communicated by the squad leader or platoon commander.
Establishing Formations
When it comes time to establish a formation, a leader must remember that he must give RELATIVE offsets. This means that the leader is telling teams where to go, relative to the direction of movement and the leading element.
For example, to describe a standard wedge formation, a team leader would say:
"Squad, form wedge, oriented south-west. One is leading, two on the left, three on the right."
This is as opposed to saying something like:
"Squad, form wedge. Two is to the south-west of one and three is to the north-east." (BAD, do not do this!)
The former is simple and easy, the latter would require players to look at their maps or compass, and has a higher likelihood of being misunderstood. Particularly when the situation is heated, it is important to use orders that are simple and easily understood. Always strive for giving formation offsets in a manner relative to the direction of movement and the leading element, using simple and clear "front, left, right, rear" style language and simple distance offsets for element intervals.
Controlling Formations
Controlling formations is the art of ensuring that teams maintain appropriate intervals and offsets relative to the tactical situation and terrain. Establishing a formation is easy, whereas controlling one throughout the duration of a mission is more difficult. Control is exercised by the overall leader of the formation - either a Fireteam Leader (for fireteams), a Squad Leader (for squads), or the Platoon Commander (for the entire platoon formation).
Responsibilities of the Leader when Controlling Formations
- Ensures that the formation being used is appropriate to the situation and terrain
- Helps to guide elements back into place in the event that they stray too far from the formation without just cause
- Responsible for giving changes in overall direction and spacings
- Uses clear and concise tactical language to control the formation
Note that when controlling a formation's movement, the same relative direction rules apply as when initially establishing one. A formation leader must give corrections relative to the direction of movement and the leading formation element.
For example, if a fireteam was out of formation, a team leader would say something like:
"Team 2, shift up and left to get on-line with team 1."
These types of clear, simple directions allow for maximum comprehension and rapid reaction to orders.
Responsibilities of a Formation Element
When moving in a formation, each element of the formation has a few standard responsibilities based on whether they're leading or following in the formation.
Responsibilities of the Leading Element
The leading element is typically the 1st Fireteam of a squad, or the Alpha Squad of the platoon, unless otherwise noted. Their responsibilities are as follows.
- Lead the formation in accordance with orders given
- Act as a guide for the other formation elements to maneuver relative to
- Ensure that they do not out-pace the trail formation elements
- Observe to the front, front-left, and front-right as they move
- Provide a point element when necessary
Responsibilities of the Trail Elements
The trail elements are typically the 2nd and 3rd fireteams of a squad, or the Bravo and Charlie squads of a platoon. Their responsibilities are as follows.
- Maintain appropriate interval and offset from the leading element; prevent gaps from developing
- Communicate with the leading element to let them know if they're going too fast or too slow
- Observe in the direction that they are offset from the lead element. If offset to the left, they watch to the left and front. If offset to the right, they observe to the right and front. If acting as a rear-security element, they observe to the rear. If there is no dedicated rear-security element, they share responsibility for observation to the rear with the other trail elements.
Common Formations
These are the four main formations that you will see used the majority of the time. The common theme is that they are easy to establish, control, and are very flexible.
Wedge
The wedge formation is a very versatile one that is easy to establish and control. It allows for good all-around observation and security, and can be used in the majority of situations encountered. Fire can be placed in any direction in good quantity, and a shift in formation upon contact is easy to accomplish to suit where the contact came from.
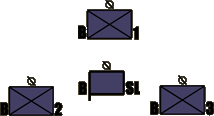
If used at the squad level, the squad leader typically trails behind the leading fireteam, putting himself in the middle of the formation where he can best control things. When used at the fireteam level, the fireteam leader is the tip of the wedge, and the fireteam members guide off of his movements.
The wedge formation is the one most naturally assumed during gameplay, and is also the preferred formation to use when assaulting the enemy.
When not otherwise stated, the default formation for fireteams and squads is the wedge formation.
Note that when transitioning a wedge into a line, the 2nd and 3rd elements simply move forward onto the left and right of the leading element, respectively.
Line
The line formation is well-suited for advancing towards a known or suspected threat with the maximum number of guns brought to bear, and excels at placing a heavy volume of fire to the formation's front.
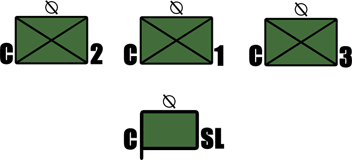
The line formation offers great overlapping fields of observation and heavy fire to the front. It is relatively easy to control, but suffers from being vulnerable to flanking fire. It also does not offer great flank or rear security, and should be employed with that in mind.
Column (Staggered)
The column formation is the simplest formation to establish, as it is merely a matter of follow-the-leader. It allows for very rapid movement because of this.
This formation is best used during travel when contact is not imminently expected or speed is a high priority.

A column formation has great firepower to the flanks, but is not geared towards contact from the front (which it is vulnerable to). A column can rapidly shift upon contact to a line or other formation where appropriate, giving it good flexibility.
Column formations can be used when traveling through an area where it is not practical to spread out into a line, wedge, or other formation. For instance, travel through a restricted valley might require a column.
It is important to note that "column" formations should not consist of one-after-the-other perfectly-lined-up troops. Staggering the column so that nobody is directly in line of each other helps to reduce the vulnerability that the formation would otherwise have from the front and rear.
Less Common Formations
Echelons (Left & Right)
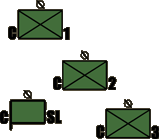
Echelon formations can be established when traveling in an area where the threat direction is overwhelmingly likely to be either to the left or the right of the line of travel. These are basically just half-wedge formations, and they focus firepower towards the flank that has been echeloned.
Echelons can be used effectively in a platoon-level wedge movement, with the leading squad being in squad wedge or line, and the two trailing squads being echeloned in the direction they're offset from the lead.
Vee
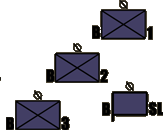
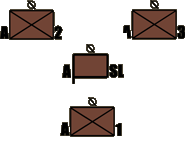
The Vee is a reverse of the Wedge formation, where two elements lead the group, a third acts as trail, and the element leader stays in the center to control the formation and movement. This formation can be good when you know that contact will mostly come from the front but you don't want to commit to a line formation and want to maintain flexibility.
Ranger File
The 'Ranger file' is a simple manner of follow-the-leader, even more basic than the column. When in a 'ranger file', each player lines up after the one in front of him. Ranger files allow for a number of troops to move over the same piece of ground, without deviation from the person in front of them.
For our purposes, ranger files are primarily used when dealing with antipersonnel minefields. Apart from that, they have little use - any situation that a ranger file could be established in, a staggered column would typically work better.

