![]()
There are a variety of movement techniques that are applicable to A2's environment and simulation fidelity. Utilizing the best one for a situation will do a great deal to protect a team and provide security as well as flexibility, and it's important that all players are familiar with the differences between the various types.
Traveling
Traveling is simply movement from point A to point B without anything fancy. The spacing between elements is typically small to maintain good control over the unit. Traveling movement is used when enemy contact is unlikely. Logic tells you that 'traveling' has the least application to our gaming - enemy contact is almost always likely for us, so movement in "traveling" mode is dangerous most of the time.
Traveling Overwatch
Traveling Overwatch is where things start to become more applicable to gaming. This movement method simply increases the distance between elements. The extra space allows for more room to maneuver and decreases the density of friendly forces, which in turn increases the security of the unit by making it harder for an enemy to inflict large casualties via a sudden ambush or explosive trap.
When moving via traveling overwatch, particularly as in a squad or platoon line formation, one element is designated as the lead or "guide-on" element. This element controls the rate of movement or speed of advance, with other elements "guiding" off of them. If this element halts, the whole formation halts. If they move, the formation moves. This helps to ensure that the overall group formation does not overrun itself or get far out of formation.
Bounding Overwatch
Bounding Overwatch is the de-facto "Standard Infantry Movement Technique". It is one of the most fundamental combat movement skills practiced and happens to be one of the easiest to employ as well.
The basic principle of bounding overwatch is that one element is always stationary and covering the movement of the other element(s). There are two main techniques available - alternating and successive. The choice of which one will be used depends on the threat level and the speed required. Oftentimes it will become a very fluid execution that blends alternating and successive bounds as the situation requires. Being familiar with all aspects and employments of bounding overwatch allows leaders to be tactically knowledgeable enough to carry out such blended, situation-dependent employments.
Bounding Overwatch Guidelines
Here are some general guidelines to keep in mind when employing bounding overwatch.
- Element leaders should ensure that the bounding teams are close enough to where they can support each other with fire. With this in mind, it would be wise to prevent two infantry elements from be separated by more than 300 meters, as a general guideline.
- Element leaders should try to get superior ground when providing overwatch. A commanding view of the terrain increases the effectiveness of an overwatch element a great deal.
- The size of each bound should be based on the terrain, visibility, proximity of enemy threat, etc. For instance, bounds across relatively open terrain can be long - both in the interest of getting across as quickly as possible and because the range of the overwatch element is higher due to the open terrain. Urban bounds, on the other hand, are typically short due to the increased density of the area and the desire to maintain security and not overextend any one element.
- Vehicles (and their inherently longer-range weapons) can have larger intervals between themselves if necessary, so long as they are never out of effective weapon range of each other.
Next, we'll move on to the two main types of bounding overwatch.
Successive Bounding Overwatch
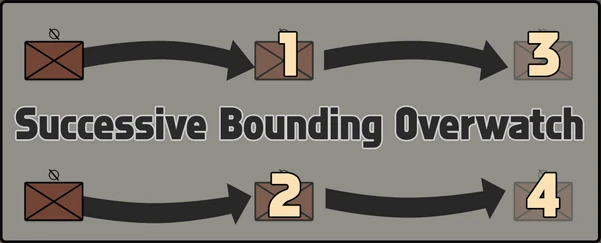
Successive bounding overwatch is the slower of the two. In it, one team advances, halts, and then the other team advances on-line with them, halts, and the process repeats itself. This provides a high level of security, but with the tradeoff of taking longer to employ.
Alternating Bounding Overwatch
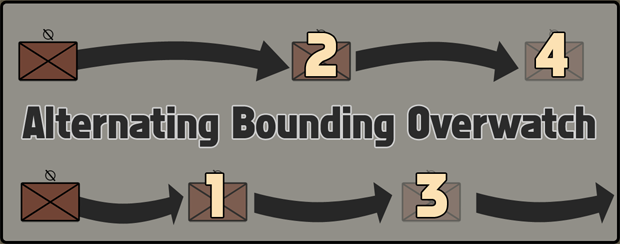
Alternating bounding overwatch is the fastest of the two, sacrificing some security for additional speed. In this mode, the teams bound past each other before stopping and allowing the other team to pass them.
Final Words & 'Fire & Maneuver'
Bounding overwatch should be used any time that contact is likely or imminent. The security of having an entire element (be it a squad or fireteam) specifically scanning for threats while another element moves is enormously beneficial to the team.
The radio command to initiate bounding overwatch is along these lines:
Alpha SL: Squad, prepare to bound! Alternating bounds, one first, then two, then three. One, move when ready."
Note that bounding overwatch changes to fire and maneuver once contact has been made. The same basic principles apply as with bounding overwatch, with one team putting down fire while the other team maneuvers to a new position, at which point the moving team takes position and begins firing to cover the advance of the other team.
Crossing a Danger Area
Danger areas are locations at which there's a heightened level of vulnerability for anyone caught within them, and must be treated with due caution. They can be bridges, streams, large open lanes in forested terrain, or even streets in an urban environment. Danger areas are frequently observed by the enemy, and can have snipers, machinegunners, or enemy rifle fireteams ready to deliver fire into them on short notice.
The technique for crossing a danger area is another form of bounding overwatch. The idea is to maintain security and cross in small numbers that will not draw undue attention or fire.
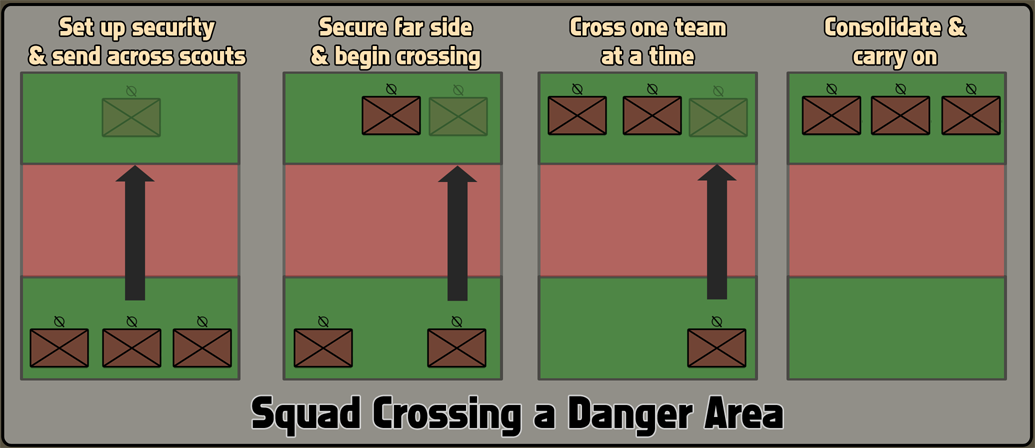
Once you have determined that you are facing a "danger area" and must treat it as such, there are four basic steps to follow.
- Set up 2/3rds of your force as a security element. Ensure that they are spread out sufficiently that they do not stick out to observation. They will be concerned with watching the flanks and rear as well as observing and covering the scout element when it crosses.
- Send a scout element (typically fireteam-sized) across first while the other elements cover them. The scouts will do a limited penetration of the far side of the danger area, check for enemy forces, and then act as security for the rest of the group when they cross.
- Once the scouts have given the all-clear, begin crossing remaining elements one at a time.
- Once everyone is across, consolidate and continue on with the mission.
Note that if the group is under fire and crossing a danger area, smoke should be used extensively, and security for the crossing elements should be provided by suppression fires.


