Androidではアプリケーションが所有するデータを公開する手段としてコンテントプロバイダを提供しています。
コンテントプロバイダによって、アプリケーション間でデータを連携させたり、
「ライブフォルダ」機能を使えば、アプリケーションを起動することなくユーザにデータを公開する行うことができます。
標準でインストールされているアドレス帳アプリケーションContactsからコンテントプロバイダ経由でデータを取得する手順を説明します。
アクティビティの作成
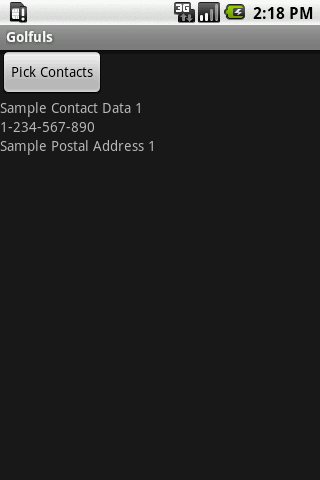
Contactsのデータを表示するために簡易的なアクティビティを作成します。
取得するフィールドは、「名前」「電話番号」「住所」の3つです。
データ取得を実行するButtonと、フィールドを表示するTextViewを配置したレイアウトファイルを作成し、res/layoutフォルダに置きます。
pick_contacts.xml
<?xml version="1.0" encoding="utf-8"?>
<LinearLayout xmlns:android="http://schemas.android.com/apk/res/android"
    android:orientation="vertical"
    android:layout_width="fill_parent"
    android:layout_height="fill_parent">
    <Button
        android:id="@+id/pick_contacts_button"
        android:layout_width="wrap_content"
        android:layout_height="wrap_content"
        android:text="Pick Contacts" />
    <TextView
        android:id="@+id/contacts_name_text"
        android:layout_width="fill_parent"
        android:layout_height="wrap_content" />
    <TextView
        android:id="@+id/contacts_number_text"
        android:layout_width="fill_parent"
        android:layout_height="wrap_content" />
    <TextView
        android:id="@+id/contacts_address_text"
        android:layout_width="fill_parent"
        android:layout_height="wrap_content" />
</LinearLayout>
レイアウトを読み込むアクティビティも作成します。
(アプリケーションパッケージを"org.example.contacts"、アクティビティパッケージを"org.example.contacts.pick"としています。)
PickContactsActivity.java
Contactsのデータ読込に必要なパーミッションをマニフェストに追加します。
<uses-permission android:name="android.permission.READ_CONTACTS" />
インテントの生成
Contactsのデータからデータを選択するアクティビティを作成する必要はありません。
「Contactsのデータから」「一つを選択する」というインテントを生成しstartActivity()やstartActivityForResult()で起動するだけで、
Androidがデータの取得と、取得したデータを表示するリストを提供してくれます。
Intent intent = new Intent(Intent.ACTION_PICK, People.CONTENT_URI);
startActivityForResult(intent, REQUEST_PICK_CONTACT);
「一つを選択する」にIntent.ACTION_PICK、「Contactsのデータから」にPeople.CONTENT_URIを指定します。
PeopleクラスはContactsアプリケーションの一件のデータを表すユーティリティクラスです。
コンテントプロバイダによってデータが公開されるアプリケーションは、Peopleクラスのように
コンテントのURIや取得出来るフィールド名などのインターフェースも公開されています。
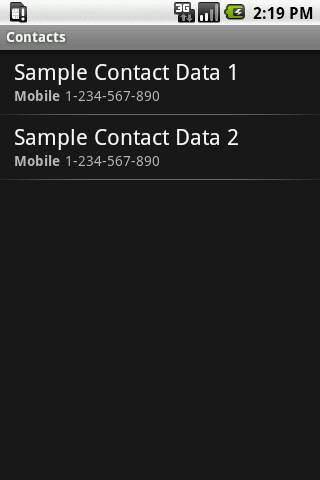
作成したインテントを投げると下記のような選択画面が表示されます。

startActivityForResult()で起動すると、選択されたデータのURIがonActivityResult()で取得できます。
Cursorの管理
コンテントプロバイダからデータを取得するには、ContentResolver#query()メソッドを使ってCursorを取得する必要があります。
ActivityにはmanagedQuery()メソッドが用意されていて、Cursorの作成とActivityのライフサイクルに合わせた
Cursorのクローズなどを行ってくれます。
Uri uri = returnedIntent.getData();
Cursor personCursor = managedQuery(uri, null, null, null, null);
フィールドの取得
「名前」「電話番号」「住所」の値をCursorから取得するには、Cursor内のインデックスを取得し、
getString()やgetInt()メソッドを使用して値の取得を行います。
int idIndex = personCursor.getColumnIndexOrThrow(People._ID);
int nameIndex = personCursor.getColumnIndexOrThrow(People.NAME);
int numberIndex = personCursor.getColumnIndexOrThrow(People.NUMBER);
String id = personCursor.getString(idIndex);
String name = personCursor.getString(nameIndex);
String number = personCursor.getString(numberIndex);
条件の指定
「住所」の情報はPeopleのCONTENT_URIから取得できるテーブルとは異なるContactMethodテーブルとして管理されているため、
PeopleのIDを検索条件としてContactMethodテーブルのCursorを再度取得する必要があります。
StringBuilder where = new StringBuilder();
where.append(ContactMethods.PERSON_ID).append(" == ").append(id).append(" AND ");
where.append(ContactMethods.KIND).append(" == ").append(Contacts.KIND_POSTAL);
String selection = where.toString();
Cursor addressCursor = managedQuery(ContactMethods.CONTENT_URI, null, selection, null, null);
managedQuery()メソッドに指定する引数には以下のものがあります。
| 引数名 | 型 | 説明 |
| projection | String[] | 取得するフィールド名を指定します。 |
| selection | String | SQLのWHERE句に相当する文字列を指定します。 |
| selectionArgs | String[] | selectionに含まれる"?"が指定された値に置き換えられます。 |
| sortOrder | String | SQLのORDER BY句に相当する文字列を指定します。 |
条件となる引数が不要な場合は、nullを指定します。
Peopleと同様に、インデックス取得後にgetString()で「住所」を取得し、TextViewに表示します。
String address = "";
if (addressCursor.moveToFirst()) {
    int addressIndex = addressCursor.getColumnIndexOrThrow(ContactMethodsColumns.DATA);
    address = addressCursor.getString(addressIndex);
}


