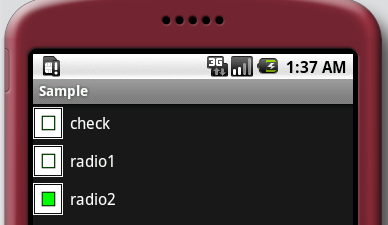
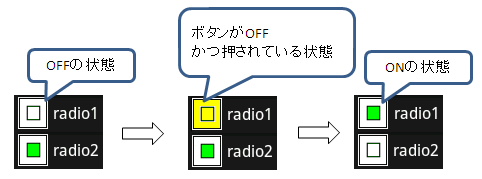
CheckBox、RadioButtonのボタンを、思い通りの画像に変更したい場合は下記の方法で編集します。
ボタン画像作成
それぞれの状態のボタン画像を作成します。
- ボタンがONの状態

- ボタンがONかつ押されている状態

- ボタンがOFFの状態

- ボタンがOFFかつ押されている状態

作成したボタン画像をdrawableフォルダに配置します。
画像定義
画像をxmlに定義します。itemの(1)と(2)、(3)と(4)の順番が逆の場合はボタンを押している状態の画像が表示されなくなりますので注意してください。
作成したxmlファイルはdrawableフォルダに配置します。
button.xml
<?xml version="1.0" encoding="UTF-8"?>
<selector xmlns:android="http://schemas.android.com/apk/res/android">
	<!-- (1) -->
	<item
		android:state_checked="true"
		android:state_pressed="true"
		android:drawable="@drawable/btn_on_pressed" />
	<!-- (2) -->
	<item
		android:state_checked="true"
		android:drawable="@drawable/btn_on" />
	<!-- (3) -->
	<item
		android:state_checked="false"
		android:state_pressed="true"
		android:drawable="@drawable/btn_off_pressed" />
	<!-- (4) -->
	<item
		android:state_checked="false"
		android:drawable="@drawable/btn_off" />
</selector>
style定義
画像定義で作成したxmlファイル(変更用ボタン画像)を参照する新たなスタイルを定義します。
styles.xmlファイルを以下のように作成してください。
作成したxmlファイルはvaluesに配置します。
styles.xml
<?xml version="1.0" encoding="UTF-8"?>
<resources>
<!-- CheckBoxの場合 -->
	<style name="NewCheckBox" parent="android:Widget.CompoundButton.CheckBox">
		<item name="android:button">@drawable/button</item>
	</style>
<!-- RadioButtonの場合 -->
	<style name="NewRadioButton" parent="android:Widget.CompoundButton.RadioButton">
		<item name="android:button">@drawable/button</item>
	</style>
</resources>
styleを使う
style="@style/NewRadioButton"を指定しstyle定義で定義したスタイルを適用します。
layoutのxmlファイルを以下のように作成します。
sample.xml
<?xml version="1.0" encoding="UTF-8"?>
<LinearLayout
    xmlns:android="http://schemas.android.com/apk/res/android"
    android:orientation="vertical"
    android:layout_width="fill_parent"
    android:layout_height="fill_parent">
    <!-- CheckBoxの作成 -->
    <LinearLayout
        android:layout_width="fill_parent"
        android:layout_height="wrap_content"
        android:orientation="vertical">
        <CheckBox
            android:id="@+id/check"
            android:layout_width="wrap_content"
            android:layout_height="wrap_content"
            style="@style/NewCheckBox"
            android:text="check" />
    </LinearLayout>
    <!-- RadioButtonの作成 -->
    <RadioGroup
        android:layout_width="fill_parent"
        android:layout_height="wrap_content"
        android:orientation="vertical"
        android:checkedButton="@+id/radio2">
        <RadioButton
            android:id="@+id/radio1 "
            style="@style/NewRadioButton"
            android:text="radio1" />
        <RadioButton
            android:id="@id/radio2"
            style="@style/NewRadioButton"
            android:text="radio2" />
    </RadioGroup>
</LinearLayout>
- wwwwwwwwwめんどい -- 2016-11-18 (金) 13:54:24
- 失礼しました。drawable、valuesフォルダに別れていたんですね。 -- 2010-11-02 (火) 23:29:01
- style="@style/NewRadioButton"を指定すると、エラーになります。 -- 2010-11-02 (火) 23:25:52
- プログラム上からStyleを設定する方法を教えてください -- 2010-05-23 (日) 23:27:26


